Sunday, April 29, 2012

Refrigerator Oatmeal

I recently started purging my facebook of all the crazy pages I have liked over the years, and have been replacing them with things that make me smile.

I love seeing my news feed, filled with homemaking, recipes, farming, gardening etc.

2012_04290008

This morning, one of new favorite FB pages posted a link to this Refrigerator Oatmeal.  Refrigerator Oatmeal!!!

Now I've tried overnight oatmeal in the crockpot, but I honestly had no idea you could make it in the refrigerator and then to be able to go crazy with all the flavor combinations.  Oh boy.

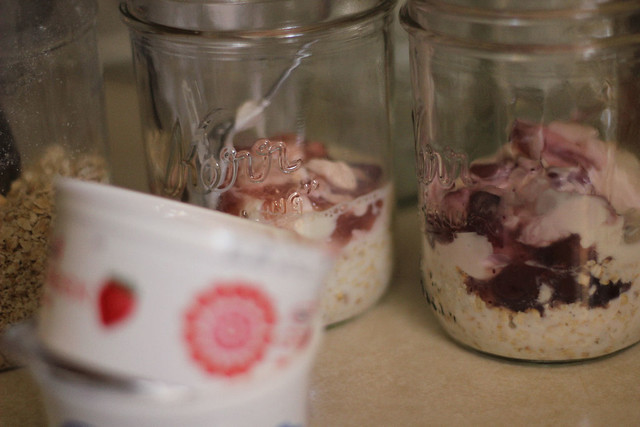
I bookmarked the page and this afternoon while doing my usual Sunday replenishing of cookie jars, canning, lunches for the week etc, I made a few jars of this oatmeal to enjoy for breakfast this coming week.

These are SO SO easy to put together, I'm just in awe.  Can't wait to try the first one tomorrow and see how it turns out.

Monica from the Yummy Life gives us a bunch of different flavors to try such as Mango Almond, Blueberry Maple, Apple CinnamonBanana Cocoa....as well as the basic recipe, which is....

old fashioned rolled oats (not instant, quick, or steel-cut)
Greek yogurt (regular yogurt is thinner; if you use it, you'll need to reduce the amount of milk); read my post for easy instructions for straining regular yogurt to make Greek yogurt.
milk (I used skim, but any kind will work)
chia seeds; I bought mine at Whole Foods; available on
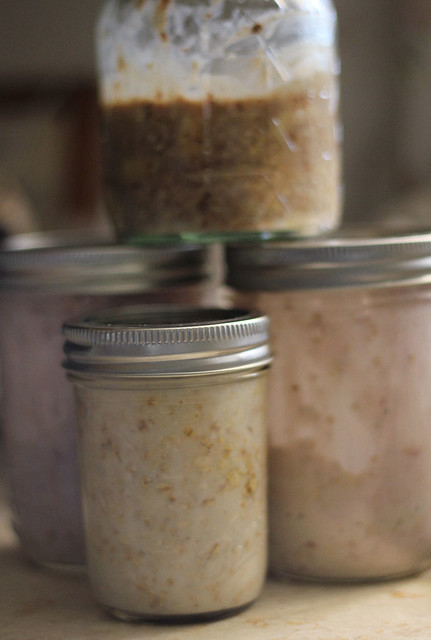
half pint (1 cup) mason jars


I am not using Chia seeds, so had to change it a little.  The recipes below are adapted from Monica's.

2012_04290007

Refrigerator Banana Chocolate Oatmeal


1/4 cup uncooked old fashioned oats
1/4 cup whole milk
1/4 cup Vanilla Greek yogurt
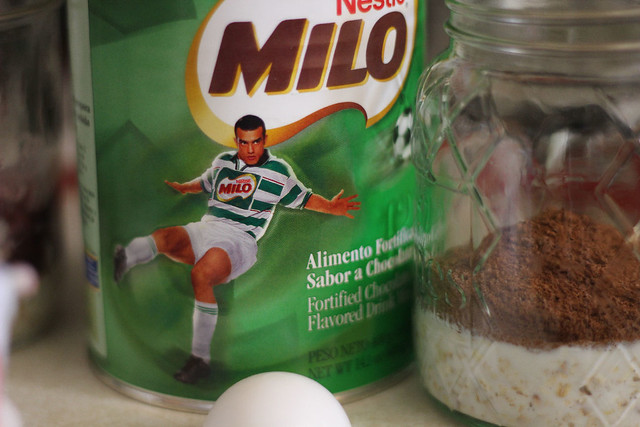
1 tablespoon Milo chocolate drink
1 teaspoon honey
1/2 a banana or enough to fill jar

In a half pint (1 cup) jar, add oats, milk, yogurt, milo and honey. Put lid on jar and shake until well combined. Remove lid, add bananas and stir until mixed throughout. Return lid to jar and refrigerate overnight or up to 2 days. Eat chilled.

2012_04290009

Refrigerator Peanut Butter and Banana Oatmeal


1/4 cup uncooked old fashioned oats
1/4 cup whole milk
1/4 cup Vanilla Greek yogurt
1 teaspoon peanut butter
1 teaspoon honey
1/2 a banana or enough to fill jar

In a half pint (1 cup) jar, add oats, milk, yogurt, peanut butter and honey. Put lid on jar and shake until well combined. Remove lid, add bananas and stir until mixed throughout. Return lid to jar and refrigerate overnight or up to 2 days. Eat chilled.

2012_04290006

Refrigerator Strawberry Oatmeal


1/4 cup uncooked old fashioned oats
1/4 cup whole milk
1/4 cup strawberry Greek yogurt
1 teaspoon honey

In a half pint (1 cup) jar, add oats, milk, yogurt, and honey. Put lid on jar and shake until well combined. Refrigerate overnight or up to 2 days. Eat chilled.

2012_04290011

Refrigerator Blueberry Oatmeal


1/4 cup uncooked old fashioned oats
1/4 cup whole milk
1/4 cup blueberry Greek yogurt
1 teaspoon honey

In a half pint (1 cup) jar, add oats, milk, yogurt, and honey. Put lid on jar and shake until well combined. Refrigerate overnight or up to 2 days. Eat chilled.

2012_04290012

Saturday, April 28, 2012

Homemade Cheese Crackers

I hope I have your attention because this is one post you're NOT going to want to miss.

Homemade, that in itself gets my ears perked up, but when it's stuff that I'm used to buying at the store and paying ridiculous money for something loaded with ingredients that I can't even pronounce.....then I'm really really but really happy.

2012_04280009

My kids, and hubby and I to be honest, love snacking on cheese it's or any kind of cheese crackers, and since I'm trying to switch to as much homemade as I can, I have looked online for recipes to make crackers at home.

I found a few and have put it off for a while, but I'm sick with a cold for the past 2 days and was wanting something to snack on this morning and just couldn't quite figure out what.  Then a light bulb went off and I remembered this recipe I saved from Happy Simple Living.  It is just what I was looking for and OH.MY.GOSH, these are so good.

The 9 year old has asked me to make him a big batch just for himself.  The 13 year old said she would buy the ingredients herself LOL  And the hubby is happily munching away, throwing out an "Ooooooh" every few minutes.

So, no more excuses for not making these, if you have cheese, butter and shortening, you're good to go and you'll thank me for it.

I will never buy store bought again.

2012_04280011

Homemade Cheese Crackers


8 ounces grated sharp cheddar cheese
3 tablespoons unsalted butter, at room temperature
1 tablespoon vegetable shortening (or substitute 1 tablespoon unsalted butter)
1 teaspoon sea salt
1 cup flour
2 tablespoons ice water


Combine the cheese, butter, shortening and salt in a food processor or in the bowl of a stand mixer fitted with the paddle attachment.

2012_04280001

Add the flour and pulse or mix on low speed until the mixture is combined.

Add the ice water slowly with the mixer or food processor running.

You may need to add a few more drops of water, but go slowly so you don’t overdo it. Gather up the dough and pat it into three disc shapes. Don’t knead it or mess with it too much.

2012_04280003

Wrap the discs tightly in waxed paper or parchment and refrigerate for at least an hour, or until you’re ready to bake the crackers. The dough can be refrigerated like this for up to 5 days.

Preheat the oven to 350 degrees F. Let the dough sit out at room temperature for about 20 minutes, and cut a piece of parchment paper to fit your favorite baking sheet. Gently begin to roll the dough out directly on the parchment paper. At first it may seem a little unyielding, …but just take your time and press the cracks back together as you go.

Keep persevering, and roll the dough quite thin, to a thickness of about 1/8 inch.

2012_04280005

Now it’s time for the fun part! Cut the crackers into 1 inch squares. You can use a pizza cutter, a sharp knife, or a fancy pastry cutter to do this.

2012_04280006

Poke a hole in the center of each cracker with a skewer. Along with being decorative, the hole allows the steam to escape which helps your crackers bake up nice and crisp.

Use a sharp spatula to separate the crackers gently on the parchment paper and transfer the whole paper (scraps, too – perfect snacks for the chef!) to a baking sheet. Bake the crackers for about 12 to 13 minutes, or until lightly browned around the edges. (Depending on how your oven cooks, your baking time may be more or less so watch the first batch carefully.)

Cool the whole sheet on a wire baking rack and repeat with the remaining dough. You can serve the crackers warm, or cool them completely and store them in a container with a tight fitting lid. This recipe makes about 8 dozen crackers.

2012_04280010

Saturday, April 21, 2012

Iced Mint Tea

It is hot outside.

I mean HOT people.  It's over 100 degrees already which just means that Arizona summer is well on it's way.  Time to buck up and get ready for sweating profusely, guzzling large amounts of water and other delicious drinks and staying inside.  Well......or outside if it's near misters, and I don't mean men, I mean mist thingamabobs.  You know what I mean.

I've been growing veggies and herbs, actually it's my second year doing it and I'm amazed at how well I'm keeping everything alive, if you knew me you would understand that it's a huge thing.  I am not known as the Thumb of Death for nothing.

Iced Mint Tea

But, I've managed to get quite an abundance of fresh spearmint and peppermint and I've been trying to use them in many different ways.

One of my favorites, is in Iced tea.  So simple to make and it's refreshing and delicious on a hot day.  Right now I have a batch seeping, it will be ready in about an hour and then all that is left is to add some more water and a few ice cubes and enjoy.

Here's how I make mine:

Iced Mint Tea

Iced Mint Tea


4 cups of water
1 cup of sugar
1/3 cup lemon juice (I use fresh lemons)
4 tea bags
About a cup of loosely packed mint leaves (I use a mix of spearmint and peppermint)
4 cups of cold water


You can do it on the stove, but I make mine in the microwave just to be quicker.

Iced Mint Tea

Using my Pampered Chef mixing bowl, I add the first 4 cups of water, pop it in the microwave for about 6 minutes or until boiling hot. Remove, and add in the cup of sugar. Stir it up until the sugar is dissolved.

Then add the tea bags, lemon juice and mint leaves.

Iced Mint Tea

Pop the lid on and let it sit for an hour.

Remove the tea bags from the water and discard. Strain the tea mixture into a 2 Quart pitcher. Stir in the 4 cups of cold water, then cover and refrigerate for another hour or so.

Pour into mason jars and add in a few ice cubes and a small leaf of peppermint, if you wish :) Enjoy!!!

Saturday, April 14, 2012

Menu Plan for the next two weeks

So here's what's going to be happening in the kitchen in the next two weeks.


Sunday 15th
Rice with bacon, ham and oregano

Monday 16th
Mexican Lasagna

Tuesday 17th
Portuguese Steak with Mushroom sauce and fries

Wednesday 18th
Grilled Tilapia w/ salad

Thursday 19th
Pork Chops with Garlic and Mustard, Rice

Friday 20th
Roast pork loin with potatoes and carrots

Saturday 21st
Chicken Spaghetti

Sunday 22nd
Shepherds Piea

Monday 23rd
Burgers with Jalapeno Cheddar Burger Rolls

Tuesday 24th
Tacos

Wednesday 25th
Creamy Chicken Florentine

Thursday 26th
Feijoada com arroz

Friday 27th
Homemade Pizza

Saturday 28th
Sausages in Tomato Sauce

Sunday 29th
Chicken Curry

Monday 30th
Sub Sandwiches

Tuesday, April 10, 2012

Multigrain Bread

Multigrain bread

I know that it can be a bit overwhelming, truth be told many of the multigrain recipes call for so many ingredients and half of them you don't even know where to find. I'm not a gourmet cook, I've said it like a gazillion times and I wouldn't even know where to go find gourmet anything or special this or that. I don't frequent whole food stores or organic places, my base commissary is my gourmet shop and if you've ever been in one you'll know that it's hilarious to even suggest such a thing.

But anyway, I have dabbled with multigrain breads for a while, I researched here and there and looked at what seemed like an ocean of recipes. None caught my eye, until this one. It's really easy, and I promise you, the ingredients are not that extravagant. Give it a try :)

This recipe is adapted from Kiss My Spatula.

Multigrain Bread

Multigrain Bread

3/4 cup whole wheat flour
1/2 cup steel cut oats
4 tbsp flax seeds
2 1/4 cups bread flour
1 1/2 tsp table salt or 3/4 tbsp kosher salt
1 1/3 cups water
1 tbsp white distilled vinegar
1/4 tsp instant yeast

Method

Whisk flour, steel cut oats, flax seeds, yeast, and salt in large bowl. Add water and vinegar. Using rubber spatula, fold mixture, scraping up dry flour from bottom of bowl until shaggy, sticky ball forms. Cover bowl with plastic wrap. Let dough rest at least 12 hours, preferably about 18, at warm room temperature, about 70 degrees.

Lay 12X18-inch sheet of parchment paper inside 10-inch skillet and spray with nonstick cooking spray. Dough is ready when its surface is dotted with bubbles. Transfer dough to lightly floured work surface and knead 10 to 15 times. Shape dough into ball by pulling edges into middle. Transfer dough, seam-side down, to parchment-lined skillet and spray surface of dough with nonstick cooking spray. Cover loosely with plastic wrap and let rise at room temperature until dough has doubled in size and does not readily spring back when poked with finger, about 2 hours.

About 30 minutes before baking, adjust oven rack to lowest position, place 6-8 quart heavy-bottomed Dutch oven (with lid) on rack, and heat oven to 475 degrees. Lightly flour top of dough and, using razor blade or sharp knife, make 3 slits along top of dough.

Carefully remove pot from oven and remove lid. Pick up dough by lifting parchment overhang and lower into pot (let any excess parchment hang over pot edge). Cover pot and place in oven. Reduce oven temperature to 425 degrees and bake covered for 30 minutes. Remove lid and continue to bake until loaf is deep brown and instant-read thermometer inserted into center registers 210 degrees, 20 to 30 minutes longer. Carefully remove bread from pot; transfer to wire rack and cool to room temperature before slicing.

Fresh bread sandwiches

Then you have to make sandwiches right?

BLT

Sunday, April 01, 2012

Bacon and Chive Potato Salad

I think if I had to, I could easily live off potato salad and bacon, for the rest of my life.  Nothing more.

I do have to be careful because Potato salad goes straight to my hips and thighs, but goodness, I can't help it, it's like a plate of joy that needs to be inhaled.

This Potato salad is pretty basic, the only thing that makes it different is the addition of crumbled bacon and some fresh chives.  You can use the bacon bits too but I don't like those, I call them fake bacon because they can't hold a candle to the real thing, but they do certainly work in a pinch.

Bacon and Chives Potato Salad

Bacon and Chive Potato Salad


2 and 1/2 pound small red potatoes
1/2 cup cooked crumbled bacon
Fresh snipped chives
3/4 cup mayonnaise
Mustard to taste
1/2 teaspoon salt
1/4 teaspoon pepper


Place potatoes in a large saucepan and cover with water. Bring to a boil. Reduce heat; cover and cook for 15-20 minutes or until tender. Drain and cool. Cut into smaller chunks.

Add bacon and chives, mayonnaise, mustard, salt and pepper and stir well to combine. Some don't like broken up potatoes and mushy salad....I do, so when I stir I really am not looking to keep the potatoes in one piece.

If you are, then just mix the mayo, mustard, salt and pepper in a separate bowl before adding to the rest, then stir gently to combine.

Refrigerate until ready to serve.

Bacon and Chives Potato Salad

Grilled Bacon Burgers

Whew, I'm back from the brief hiatus.

It felt good to get away from the internet and this crazy fast paced world, to just relax for a bit and not feel so overwhelmed and stressed with day to day life.  BUT, I did miss sharing my recipes online, so I'm glad to be back on track.

I'm going to share 3 recipes this morning/afternoon and I do have a few more coming up next week :)

The weather here has been absolutely beautiful and just yesterday we were sitting at 90 degrees, so up went the Canopy in the back yard, out came the grill and these babies were thrown on.

Grilled Bacon Burger

Grilled Bacon Burgers


1 egg
1/2 cup shredded cheddar cheese
2 tablespoons chopped onion
2 tablespoons soy sauce
2 tablespoons ketchup
1/4 teaspoon pepper
1 pound ground beef
5 bacon strips
5 hamburger buns, split
Leaf lettuce, tomato slices and onion slices, optional

In a small bowl, combine the egg, cheese, onion, soy sauce, ketchup and pepper. Crumble beef over mixture and mix well. Shape into five patties. Wrap a bacon strip around each; secure with a toothpick.

Grilled Bacon Burger

Grill the patties, uncovered,

Grilled Bacon Burger

over medium-hot heat for 5 to 6 minutes

Grilled Bacon Burger

on each side

BBQ

or until a meat thermometer reads 160 degrees and juices run clear.

Grilled Bacon Burger

Discard toothpicks. Serve on buns with lettuce, tomato and onion if desired.