Tuesday, August 31, 2010

Pao com Chourico - Chourico Bread

Chourico Bread

Now this is one of my favorite portuguese breads to eat. I remember many times sitting in one of the Lisbon Pastelarias (bakeries) and smelling the aroma of the bread baking in the oven, it was intoxicating but in a good way.

Chourico Bread

I am a bread lover, I could live on bread, I try not to because it's not healthy at all, but if it was possible to do so, believe it, I would have a loaf of bread and a brick of butter every.single.day.

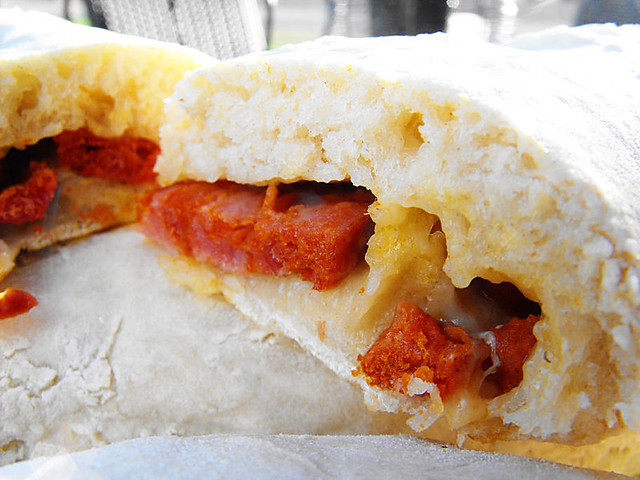
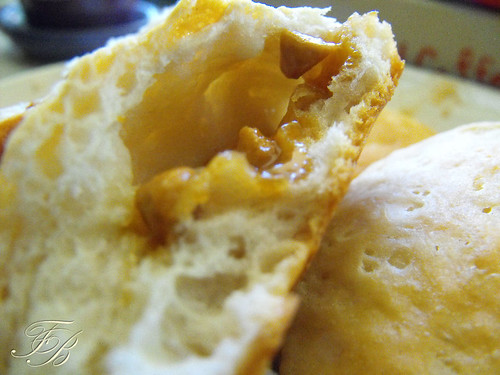
This is an extremely easy recipe to make, it almost reminds me of the other bread that we portuguese make, called a Bola de Carne. A ball of meat....literally, it's like a ball or oval shaped loaf with ham and chourico etc inside. YUM!

Chourico Bread

Pao com Chourico - Chourico Bread

5 1/2 cups of flour
3 1/2 teaspoons of dry yeast
1 chourico cut into slices and casing removed
Warm water
1 teaspoon salt (table salt)

Dissolve the yeast in 4 tablespoons of warm water. Add about 1/2 tbsp. of flour and mix well. Set aside.

In a big bowl, mix the flour, salt and the yeast mixture, add warm water a bit at a time

Chourico Bread

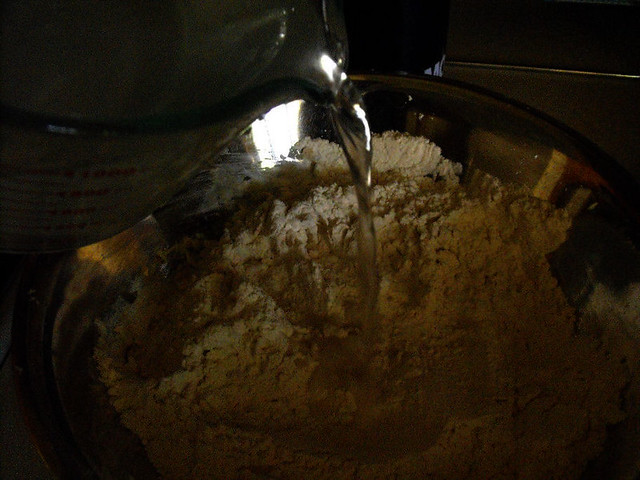
until you have a smooth dough that doesn't stick to your hands. Let rise for 3o minutes.

Chourico Bread

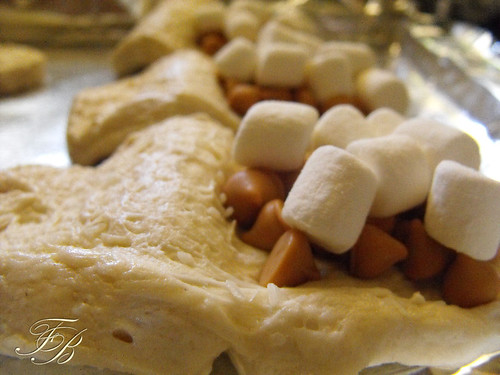
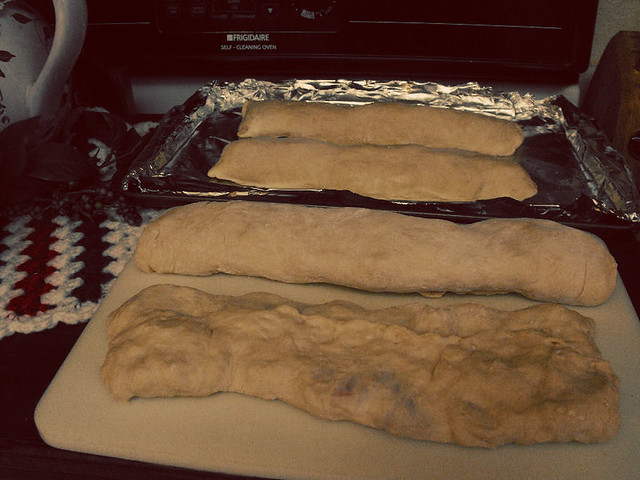
Divide into 4 portions. Using a rolling pin roll out the dough into a rectangle, not too big, you want to have a sort of thick dough....you can see by my picture how it should look.

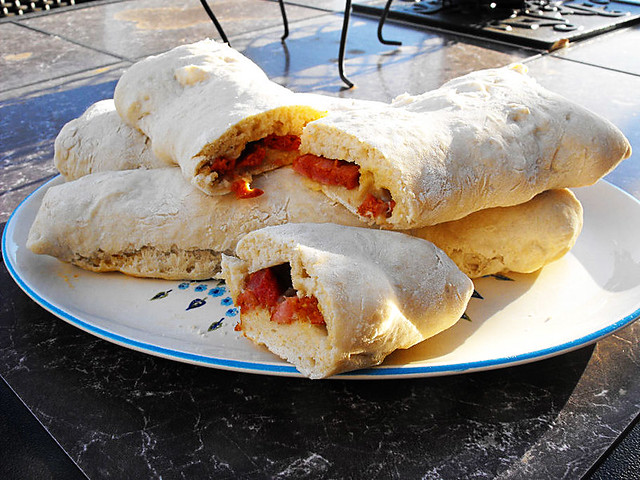
Layer the chourico on the dough....roll the dough up, pinch the seams to close and set seam side down on a baking sheet.

Chourico Bread

Let rise again until you can see that it won't rise anymore. Bake in a 375 oven for about 20 minutes.

Chourico Bread

One thing you'll notice about these loaves is that they don't turn really brown, matter of fact most of them stay a nice white pale. Enjoy!

Chourico Bread

Cheddar & Bacon Breakfast Sandwiches

Weekday breakfasts are pretty fast, it's bad enough trying to get the kids dressed and out the door to school without having to make it complicated.

But weekends I try to make a bigger breakfast, more like brunches actually.

Bacon, Ham and Cheese Sandwiches

These sandwiches are SO good and are perfect for a filling Weekend Breakfast, or even as a light lunch.

NOTE: I added Black Forest Ham to my sandwiches too.

Bacon, Ham and Cheese Sandwiches

Cheddar & Bacon Breakfast Sandwiches

3 eggs, beaten
1/4 c. milk
2 T. butter
8 thick slices bread
12 slices Cheddar cheese
4 slices bacon, crisply cooked and crumbled (I don't crumble mine)

In a large bowl, whisk together eggs and milk; set aside. Preapare a griddle or large skillet by melting butter over low heat.

Dip only one side of 4 bread slices in egg mixture. Place 4 bread slices, coated side down, on griddle or in skillet.

Top each bread slice with 3 cheese slices. Sprinkle cheese with bacon, or if you haven't crumbled it, just lay about 3 slices on top of the cheese.

Bacon, Ham and Cheese Sandwiches

Dip only one side of the remaining 4 bread slices in egg mixture and place over bacon, coated side up.

Bacon, Ham and Cheese Sandwiches

Cook 5 minutes per side or until bread is golden and cheese is melted.

Makes 4 sandwiches.

Saturday, August 28, 2010

Sun Tea

Iced Tea

Does that not make your mouth water?

I love iced tea or sweet tea as some of you may call it. There's always an endless supply of it in my refrigerator and it never lasts long in this house.

I make it the traditional way by boiling water and adding the tea bags, I make it using the powdered tea when I'm in a hurry and have no time to waste......and lately while trying to make the best of these hot Arizona days, I've been making Sun Tea.

You may have never heard of it, it's pretty much a Southern thing but the minute I came upon this different way of making Iced Tea, I knew I just had to try it.

It's different than normal Iced Tea in that it's a more subtle mellow taste, it's not as strong, but it's really delicious.


Iced Tea

Sun Tea


4-6 tea bags


Put 4 to 6 tea bags into a clean 2 quart glass container. Fill with water and cap. Place outside where the sunlight can strike the container for about 3 to 4 hours. Move the container if necessary to keep it in the sun. When the tea has reached its desired strength, remove from sun and put it in the refrigerator. You may or may not want to remove the tea bags at this point. (I always remove mine)

The tea will probably taste more mellow than what you are used to from using boiling water. The slow seeping has a way of bringing out a slightly different flavor from the tea. Also, because you didn't use boiling water, you should refrigerate the tea and drink it up pretty quickly - a day or two. It will not keep as well as iced tea made from boiling water.

You can add in some mint leaves or I usually add in lemon, orange or lime slices.

Tuesday, August 24, 2010

Microwave Caramel Pudding

Being Portuguese I would have to say that one of my favorite desserts is Pudim de Caramelo or Caramel Pudding.

The typical way to make this is in the oven in a Bain Marie, but obviously nowadays there are shortcuts for everything, so when I first found out I could make it in the microwave, I just knew I needed to give it a try.

Caramel Pudding

YUM!

Now I can have this delicious dessert in less than half the time it takes to cook it the traditional way.

Caramel Pudding

Microwave Caramel Pudding

For the caramel sauce:
1 cup of white sugar
1/3 cup of water


Pour into a microwave safe dish or bowl. Stir together and place in the microwave.

Cook for 10 minutes. If need by, cook one minute more at a time until it's nice and brown but be careful not to burn.....if you cook it too long it will become really bitter, you don't want that.


For the pudding:
3 eggs
1 can of condensed milk

1 can measurement of whole milk (just use the same can)


Pour into a blender and mix until well incorporated. Pour onto the caramel in the bowl and pop back in the microwave for 5 minutes on HIGH.

Cook for another 1 to 3 minutes on 70% POWER.

To test if done, use a toothpick, if it comes out clean it's done. Cover with a kitchen towel and let sit for 10 minutes.

When cold, turn out onto a clean plate.

Do NOT try to turn it out before it's completely cool or you will end up with a huge mess, it will still taste great but it will look no so appetizing LOL

Enjoy!

Caramel Pudding

Friday, August 20, 2010

Fried Zucchini

I love, no really, I LOVE fried zucchini, matter of fact anytime we go to a restaurant that serves it as an appetizer, that is what I get.

Fried Zucchini 2

I don't make it because, well, I just have never thought of making it at home, and now I wish I had tried it a long time ago. It's so good, so easy and so


Fried Zucchini 3

Neely's Fried Zucchini


Ingredients

* Peanut oil, for frying
* 3 large zucchini, cut into 1/2-inch rounds
* 1/2 cup all-purpose flour
* 1 1/2 cups panko bread crumbs
* 1/4 cup finely grated Parmesan
* 2 tablespoons finely chopped fresh parsley leaves
* 1/2 teaspoon red pepper flakes
* Salt and freshly ground black pepper
* 3 eggs, lightly beaten
* 1/4 cup water
* Ranch dressing, for dipping


Preheat oil in a deep-fryer to 350 degrees F.

Measure flour into a pie plate. In another pie plate combine panko, Parmesan, parsley, red pepper flakes and salt and pepper, to taste. In a third plate add eggs and water. Dredge the zucchini in the flour, followed by the egg and finally in the panko.

Fried Zucchini 1

Working in batches, place the breaded zucchini slices in the hot oil and fry until golden brown, 3 to 4 minutes. Drain on a paper towel lined sheet tray and immediately season with salt and pepper.

Fried Zucchini 4

Wednesday, August 18, 2010

Blueberry Cobbler

Oh I have just been craving a Blueberry Cobbler, but for some reason I kept forgetting to buy the blueberries whenever I went grocery shopping.

2010_08170026

This last time I actually remembered to pick them up, so last night I whipped up a quick Blueberry Cobbler for after dinner.....it's SO good and it's a recipe I use all the time.

You can substitute with any fruit of your liking, like peach or strawberries or whatever you wish.


2010_08170024

Blueberry Cobbler

1/2 cup butter
1 c all purpose flour
1 c sugar
1 tbsp baking powder
pinch of salt
1 c milk
4 cup fresh or frozen fruit, whatever you like
1 tbsp of lemon juice
1 tsp cinnamon


Preheat the oven to 375 degrees.

Place the butter in a 13" X 9" pan, you can cut it into pieces to melt faster if you wish. Place the pan into the oven and let the butter melt, it won't take very long at all.

In a medium bowl, mix the flour, 3/4 cups of the sugar, milk, baking powder and salt.

In a separate bowl, mix the blueberries, lemon juice, 1/4 cup of sugar and cinnamon together.

2010_08170007

When the butter is melted, take the pan out of the oven, pour the batter in but do not stir it into the butter. Pour the fruit mixture over the batter, again DO NOT stir.

Bake for 40-45 mins or until golden brown. Eat warm or let it cool. We like ours warm with a big scoop of ice cream. YUM!

2010_08170022

Just look at that goodness??? It's delicious.

2010_08170029

Monday, August 09, 2010

Butter Chicken

I think I should just move in with Marie, you think she would mind? Cause this lady can cook, and good gravy can she cook.

You've heard me mention her cooking blog The English Kitchen, many times before but it just keeps getting better, I know that I can always count on her for a scrumptious meal, and this one was no exception.

Butter Chicken......it not only got big thumbs up from the hubby and kids but I can tell you that this is one of the best, moistest chicken I have EVER eaten and that says a lot considering it's breasts.

Go on and visit Marie, I'm sure you'll find something yummy to eat.

2010_08090008

*Butter Chicken*
Credit: The English Kitchen
Serves 4
Printable Recipe

Deliciously tender chicken breasts, dipped in egg and cracker crumbs, and then baked with butter. It's naughty, but very, very nice.

2 large eggs, beaten
8 ounces of buttery round crackers, crushed
(1 cup)
1/4 tsp garlic powder, or 1/2 tsp garlic salt
1/2 tsp black pepper
4 boneless, skinless chicken breast halves
4 ounces butter, cut into bits
(1/2 cup)

Preheat the oven to 190*C/375*F/Gas mark5. Place the eggs into a shallow bowl. Place the crackercrumbs into another shallow bowl and mix together with the garlic powder and the pepper. Dip the chicken breasts, first into the egg and then roll them in the cracker crumb mixture, coating them well. Place them in a 9 by 13 inch baking dish. Drop the pieces of butter all around the pieces of the chicken. Bake for 30 to 35 minutes in the preheated oven until the chicken is no longer pink inside, the juices run clear and the crumbs are nicely browned.

2010_08090009

Sunday, August 08, 2010

Chili with Corn Dumplings

WOW is all I can say. I've had all sort of dumplings but goodness gracious, these have got to be the best I've had in oh....forever.

Corn Dumplings, with real corn and cilantro. YUMMY!

Another winner from the Gooseberry Patch cookbook.

2010_08080003

Chili with Corn Dumplings
Credit: Gooseberry Patch Cookbook

4 1/2 lbs ground beef
2 1/4 c. chopped onion
3 (15 oz.) cans corn, undrained and dividided
3 (14 1/2 oz.) cans stewed tomatoes
3 (15 oz.) cans tomato sauce
1 T. hot pepper sauce
6 T. chili powder
1 T. garlic, minced
1 1/3 c. biscuit baking mix
2/3 c. cornmeal
2/3 c. milk
3 T. fresh cilantro, chopped

Brown ground beef and onion in a Dutch oven over medium heat; drain. Set aside 1 1/2 cups corn; stir remaining corn with liquid, tomatoes, sauces, chili powder and garlic into beef mixture.

Bring to a boil. Reduce heat; cover and simmer 15 minutes. Combine baking mix and cornmeal in a medium bowl; stir in milk, cilantro and reserved corn just until moistened.

Drop dough by rounded tablespoonfuls onto simmering chili.

2010_08080002

Cook over low heat, uncovered, 15 minutes. Cover and cook 15 to 18 more minutes or until dumplings are dry on top. Serves 10.

2010_08080004


*I halved the recipe since the amount would be way too much for our family of 4, it still made a HUGE pot and I'll have plenty of leftover chili for weekday lunches*


2010_08080005

Saturday, August 07, 2010

Cheesy Beef & Bacon Burger Meatloaf

Another winner from the Gooseberry Patch cookbook. There are just so many wonderful recipes and I can't wait to try them.

We all love meatloaf and I've actually posted quite a few variations here on the blog, but I think meatloaf is one of those dishes that you can't ever go wrong with and the amount of variations are unlimited.

This one is like taking a bite of a Cheeseburger with Bacon...SO good!

2010_08060011

Cheesy Beef & Bacon Burger Meatloaf
Credit: Gooseberry Patch Cookbook

1 lb. bacon, crisply cooked, crumbled and divided
1 1/2 lbs. ground beef sirloin
1 1/2 c. shredded Cheddar cheese
2 eggs, beaten
1/3 c. dry bread crumbs
1/3 c. mayonnaise
1 T. Worcestershire sauce
1/2 t. salt
1/2 t. pepper
1/2 c. catsup
1/4 t. hot pepper sauce
3 T. Dijon mustard

Set aside 1/2 cup bacon for topping. Combine remaining bacon, ground beef, cheese, eggs, crumbs, mayonnaise, Worcestershire sauce, salt and pepper in a large bowl; set aside.

2010_08060005

Mix together catsup, hot sauce and mustard; set aside 3 tablespoons of mixture. Add remaining catsup misture to beef mixture; blend well.

Press into an ungreased 9"x5" loaf pan; spread reserved catsup mixture over top and sprinkle with reserved bacon.

2010_08060006

Bake uncovered at 350 degrees for 50 to 60 minutes or until done. Remove from oven; let stand 5 to 10 minutes before slicing. Serves 6 to 8.

2010_08060008

Wednesday, August 04, 2010

Fried Chicken with Milk Gravy

Oh my word, I have made fried chicken many many times but this has to be the best fried chicken and gravy I have EVER brought to my lips. I'm not kidding, it was so so good.

I found this recipe in my new big Gooseberry Patch Cookbook.


FRIED CHICKEN with MILK GRAVY
Credit: Gooseberry Patch Homestyle Family Favorites


If you prefer you can substitute chicken breasts, sliced in half lengthwise so they'll cook quicker.

1 c. plus 1/4 c. all-purpose flour, divided
1 1/4 t. dried thyme
3/4 t. onion powder
3/4 t. seasoning salt
3/4 t. pepper, divided
8 chicken thighs or drumsticks
2/3 c. buttermilk
2 to 4 T. oil
1 t. chicken bouillon granules
1 1/2 c. milk

Combine 1 cup flour, thyme, onion powder, salt and 1/2 t. pepper in a large plastic zipping bag. Add chicken to bag, one or 2 pieces at a time; shake to coat well. Dip chicken into buttermilk, return to bag and shake to coat.

2010_08010004

Heat oil in a large skillet over medium heat. Add chicken and saute 15 minutes, turning to cook evenly until golden.

Reduce heat to medium-low. Cook, uncovered, 35 to 40 minutes or until chicken is tender and juices run clear when chicken is pierced with a fork.

2010_08010007

Remove chicken to paper towel, reserving drippings; cover chicken to keep warm. Stir bouillon, remaining flour and remaining pepper into skillet drippings, scraping up any browned bits. Add milk.

Cook and stir over medium heat until thickened and bubbly; cook and stir one more minute. Serve hot gravy over chicken. Serves 4.


Smore's Biscuits

Well this came about purely by accident, while looking around for something yummy for the kid's snack, I found a tube of refrigerated biscuits that I've been meaning to use.

I didn't know what to make with them, so threw some things together and let's just say the kids think I'm the coolest thing since sliced bread.

So easy, so quick and such a yummy treat.


2010_08040013


SMORE'S BISCUITS

1 tube large refrigerated biscuits
chocolate or butterscotch chips
mini marshmallows

Cut the biscuits in half, sprinkle chocolate or butterscotch chips and top with mini marshmallows.

2010_08040006

I only had butterscotch chips so I made half with those and the other half, I drizzled with chocolate syrup before adding the marshmallows.

2010_08040008

Replace the top and seal to keep from leaking, though it still leaked with me but it was such a gooey yummy mess that neither I nor the kids minded AT.ALL.

2010_08040009

Bake at 375 for about 20 minutes or until golden brown. YUM!

2010_08040011

Fish Stick Enchiladas

Did that just make you go "huh?". It's ok if it did because the first time I came upon this recipe on Marie's blog, I had the same reaction, but I also thought "oh this is different and definitely worth trying."

My kids absolutely love Fish Sticks but I'll admit it's not really one of my hubby's faves so I don't make it too often, mainly if he's deployed or working late or not here for dinner. Though I do make it at times and he eats it without complaining.

I thought I would try these on him and see what he thinks, I was hoping that taking the fish sticks out of their usual boring stick element and sprucing them up, would have a more positive effect on him. And boy, did they.

These got rave reviews from ALL of us, including not-so-thrilled-with-fish-sticks hubby.

Again, I got this recipe from The English Kitchen which is by far one of my favorite food blogs out there, you have to check out Marie's blog.

2010_08040023

*Fish Finger Enchiladas*
Makes 4
Printable Recipe

Kids will love this. Quick and easy and fairly economical. It lifts fish fingers out of the ordinary into something special!

8 frozen fish fingers
(we like cod)
295g (10 1/4 ounce) tin of condensed mushroom soup
284ml pot of sour cream (1 cup)
125g (4 ounces) cheddar cheese, grated
6 spring onions, sliced
4 soft flour tortillas
8 TBS tomato salsa
(as mild or as hot as you prefer)
more sliced spring onions to garnish

Preheat the oven to 200*C/400*F/ gas mark 5. Lightly spray a baking dish with cooking spray. Set aside.

Place the fish fingers in a baking pan and cook them for about 10 minutes, turning them over halfway through the cooking time. Remove from the oven.

While they are cooking, place the soup into a small saucepan and gently heat. When heated stir in the sour cream, 3/4 of the cheese and the first amount of spring onions. Spoon 2 dessertspoons of this onto each tortilla and then lay two fish fingers on top. (Reserve at least 1/3 of the soup for the end.)Drizzle 2 TBS of the salsa over top of the fish fingers and then roll up the tortillas. Place them, seam side down, into the baking dish. Repeat with remaining fish fingers etc.

2010_08040015

Spoon the remainder of the soup over top of the rolled tortillas and sprinkle with the remainder of the cheese.

2010_08040018

Bake in the heated oven for 15 to 20 minutes, until bubbling and golden brown. Remove from the oven, scatter with the remainder of the sliced spring onions and serve.

2010_08040020